Showing posts with label knockoffs. Show all posts

Friday, November 6, 2015

Restoration Hardware Knockoff: Twinkly Light Holiday Display

This post may contain affiliate links, but all opinions are 100% mine.  For more information, please visit my Disclosures page.

I just l-o-v-e the image on the front of the new Restoration Hardware catalog:

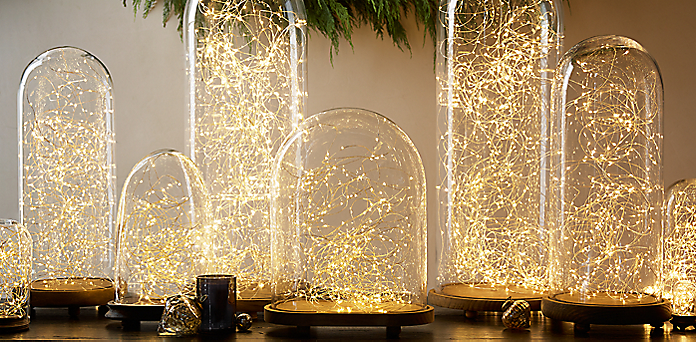
Photo: Restoration Hardware
Gorgeous gold hurricanes filled with twinkly lights...oh most definitely yes.  The only issue?  To purchase one vase of each size and two of the shortest twinkly light strands from RH you would spend $174.  And that's before tax and shipping.  So of course I did it on the cheap and here is my version:


The best part?  They only cost $25!  Here's the breakdown:

Small hurricane: $4.19
Large hurricane: $5.99
(Both from A.C. Moore on sale for 40% off)
Rustoleum Metallic spray paint: $2.74
(From A.C. Moore using 50% off coupon)
Twinkly Lights: $12.50 for two
(From amazon...hereis the link for the ones I bought)
Total: $25.42


Want to try it yourself?  Here are some tips to help you out.  Start at the top of where your gold paint should fade out. Take several quick, even passes as you rotate your hurricane vase, making sure to keep your spray paint at least 6" away from the glass.  Continue to rotate as you work your way to the bottom of the hurricane, allowing the paint to go on slightly thicker as you go.  Allow to dry for a few minutes, then spray just the bottom couple of inches, until the paint is opaque.  You should end up with a nice faded or ombre effect.

What they look like with the lights off...still cute!
A peek inside.
Just in time to get you in the mood for Christmas decorating.


The main difference with mine is that I couldn't find amber lights for cheap on amazon, so mine are warm white.  I was willing to live with that, but you could always pick up the lights from Restoration and DIY your hurricanes; you will still save money and have that pretty amber light.


You could save even more money by purchasing hurricane vases at Dollar Tree.  Either way, let me know if you try it!

 photo e0bcbc63-97e4-4f3b-adae-03bfc854ae09_zpsb8a65301.jpg
Follow on Bloglovin

P.S. Lovin' the Linky's at:


Friday, December 19, 2014

Pottery Barn Knock-Off: My Winter Mantel

Hello dearest!  Christmas time is here--happiness and cheer--and the perfect time to reconnect with my sweet peeps!  What better way than with a mantel, right?  So here it is, my:


I guess I will start with my PB inspiration:

Faceted Jewel Tree
Photo: Pottery Barn
I saw this picture in the catalog and just melted.  Things I knew I wanted: the mix of shiny and rustic, the greenery, candlelight, trees and that sweet deer.  Here's how mine turned out:


And the long view:


And the longest view:


And some of the details:

My chalkboard banner.  I used chipboard pennants and chalkboard spray paint.
Wildlife.
Had to have some "snow" for that wintry effect.
Meet Rudy.
I wrapped a tree form in twine and sprinkled glitter: easy breezy.

While it's not an exact replica, I think I achieved the feel of the Pottery Barn mantel without spending tons of money.  The only items I bought were the glitter trees in two sizes, the evergreen sprigs, and Rudy the deer--all from Hobby Lobby at 50% off.  Everything else was previously purchased or crafted from supplies I had on hand.  So how did I do?  And how are YOU doing?  Are the holidays doing you in, or are you "calm and bright?"  It is such a busy time of year, but I hope you get some wonderful family time, and some time to celebrate the birth of a king!  MERRY CHRISTMAS!

 photo e0bcbc63-97e4-4f3b-adae-03bfc854ae09_zpsb8a65301.jpg
Follow on Bloglovin

Friday, August 3, 2012

Ballard Designs Knock-Off: Wine Barrel Plaques

Hey there my peeps!


Today I thought I would check in with ya and show you my latest fun little DIY, another Ballard Designs knock-off that even the most casual DIY diva could pull off.  I originally wanted these suckers:

Wine Barrel Plaques
Photo: Ballard Designs

But, since they range in price from $69-$169, well...that aint happening.  So, I went and made me a couple:

Yes, I sipped wine and ate cashews as I shot these pics.
Yes, it was 2:20 in the afternoon.  Don't judge.


I used round Ponderosa pine panels from Lowe's which together cost me less than $20 (I bought the 15" and the 18" sizes).  Then I stained and painted them to my heart's content.  The smaller one I based closely on Ballard's design, using a basic stencil and substituting in my own numbers.  The larger one I painted using this technique. It is based on this random picture I snapped of a wine crate in one of my favorite restaurants in Belgium:

(That's why I take pictures of everything!)
Cons:
Mine aint perfect.  Let's just say they've got some hand-made personality.
Also, they are lacking that cute barrel-looking rim.  Bummer.

Pros:
The lumber and the weathered gray stain I needed (I already had the other supplies) cost less than $25.  That means I saved $165!  Okay, I actually spent $25, but you feel me, right?  For that, I can most definitely live with a little "personality" and lack of rims.  I know you agree, that's why I love ya!

Photobucket

Friday, March 2, 2012

Ballard Designs Knockoff: DIY "Zinc" Table

This post may contain affiliate links, but all opinions are 100% mine.  Please see my Disclosures page for more information.

Hello sweets!  So, I've been sprucing up my dining room to reflect my true and passionate love for neutrals, texture, and metallics.

Painted Fax Zinc Table


And, because I blew my budget on a new console, I couldn't buy the table of my dreams (the Messina table from Ballard Designs).  So I did the next best thing and made my own!  I used a table purchased at World Market...its no longer available but many of their lovely tables would be good substitutes!

Here's the Before and After:


...and all dressed up for her first meal:


Care for the play-by-play?

Supplies:

Martha Metallic in Thundercloud, Duration Home paint from SW in Creamy, Martha Faux Finishing Glaze, and Johnson Paste Wax
(clear).

Step One: A Light Sanding


Step Two: Prime and Paint the Top
I used Kilz primer tinted as dark as they could make it, and I rolled it on with a small foam roller.  Then I failed to take a picture, but you can imagine it, right?  Okie dokie.  I then painted the top with my metallic paint:


Step Three: Glaze Like Crazy
I mixed my Martha faux finishing glaze with three different acrylic paint colors (in three different bowls).

Acrylic paints in black, white, and pearl white.
I used an old, clean t-shirt to rub on the glaze in long, even strokes, varying which glaze color I used and using the black glaze very sparingly.  I have to credit Kelly at Bungalow Blue Interiors for giving me the idea for this technique, and also for the good advice to use Martha metallic paints.  When that layer of glaze was dry, I went back and glazed again, this time by dipping the t-shirt in the pearl white glaze and tapping firmly until I got it pretty blotchy but still somewhat blended.  My hope was to mimic the acid-washed-zinc look of Ballard's table.  Here's the close-up:


Step Four: Seal That Baby
I love furniture wax.  The clear Johnson wax gives painted furniture a hard, durable finish, and it is easy to apply. I have spilled on my painted table top and wiped up both oil and wine with no problem.  Love that!

Step Five: Paint & Distress the Table Legs
I slapped on three coats of my Sherwin-Williams paint in one afternoon, and distressed that sucker the next day during naptime.  That's it!

So, here's Ballard's table:
Messina Dining Table
Source: Ballard Designs

And, once again, here's mine:


How'd I do?

Photobucket
P.S. This post may contain affiliate links, but all opinions are 100% mine, all mine.
P.P.S. Lovin' the Linky's at:


Savvy Southern Style31 Days to Slash Your Budget Painlessly
The Style Sisters
  SuburbsmamaThe Shabby Nest   Fancy This   Remodelaholic       See Vanessa Craft