Showing posts with label how-to. Show all posts

Wednesday, January 20, 2016

Harry Potter Floating Candles Tutorial

This post may contain affiliate links, but all opinions are 100% mine.  For more information, please visit my Disclosures page.

As promised, here's the tutorial for my Great Hall floating candles for our Harry Potter party.

DIY Great Hall Floating Candles


Keyword here: sloppy.  They can be sloppy!  It's okay!  It will be dark(ish), they will be elevated, and everyone will love them even if they are a mess.  That was my approach and it worked out, so trust me on this.

The first step is to collect paper towel rolls for a few months or weeks, depending on how many candles you want.  Next, cut each paper towel roll in half--don't worry about being exact or even neat.

DIY Great Hall Floating Candles


Next, break out the hot glue and create drips around the top (the cut end) of the cardboard roll.  Just thickly apply hot glue, keeping the candle as straight up as possible so it drips nicely.

The next step is to spray them.  Again, sloppy was my mantra.  I laid it on thick and let it drip some, because, after all, these are drippy candles.  I used a matte white paint but I also think a dark color or black could be really cool.

DIY Great Hall Floating Candles

After spraying and allowing them to thoroughly dry, break out your hot glue again.  Now it's time to glue your battery-operated tealight candles into the top of the cardboard sleeve.  I used these lightsand liked them really well.

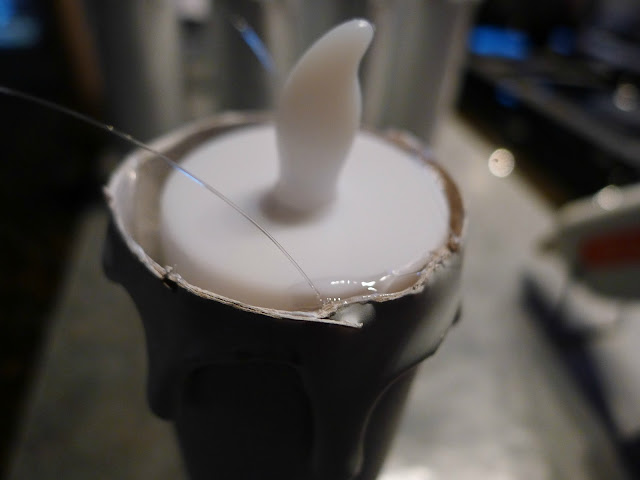
I glued them in on one side, and then reinforced on the other side with a generous dollop of glue. You will want to leave some openings for the fishing line later.

DIY Great Hall Floating Candles

Once the tealights are in there, it's time to glue in your fishing line.  This is the most maddening step, but its not too hard. I pre-cut my line to about 5-6 feet each.  On each candle I dropped a big bead of glue into the cardboard sleeve on opposite sides, then inserted about 1/2" of each end of the fishing line, to create a clear loop about three feet long.

DIY Great Hall Floating Candles

I tried to make them on exactly opposite sides of the candle so they would hang straight, with varying success.  The glue held really well, though.

DIY Great Hall Floating Candles

Now you're ready to party!  I just used thumbtacks to hang them from our ceiling and it worked like a --ahem-- charm.  Have fun!

Follow on Bloglovin

Thursday, January 7, 2016

Favorite Organizing Projects

So many of us are on a roll with organizing these days that I thought it would be fun to look back on my favorite organizing projects...

Probably my all-time favorite was making a "mudroom" out of a table and some baskets:


There's my favorite hack of all time, my adjustable-height IKEA hack of a Lego table:


Some frugal ideas for jewelry organizing:


And my office in our old house (oh how I wish my current office looked like this!):


What organizing projects are you into these days?  I did the playroom before Christmas, and my linen closet a few days ago because it was at def-con a million and needed help.  Next up: every other room in my house.

 photo e0bcbc63-97e4-4f3b-adae-03bfc854ae09_zpsb8a65301.jpg
Follow on Bloglovin

Monday, November 23, 2015

Cork Place Card Holders for the Holidays


Are you hosting Thanksgiving this year?  If you are still in need of a cute idea for place cards, maybe give this one a shot.


It's super easy, although you will want to be VERY careful.  Simply make a slit in a cork with a box-cutter or exacto-knife.  I found it helpful to make a very shallow cut initially and then dig deeper to make the groove both deeper and slightly wider.

To prop them up, you can glue them to something heavy-ish and flat, or just do what I did:


Two tacks pushed in the back at a slight angle will keep your guests from rolling around your table while you're trying to feast.

Voila!  This project took me about 30 minutes max.  Let's eat!


 photo e0bcbc63-97e4-4f3b-adae-03bfc854ae09_zpsb8a65301.jpg
Follow on Bloglovin

Friday, November 6, 2015

Restoration Hardware Knockoff: Twinkly Light Holiday Display

This post may contain affiliate links, but all opinions are 100% mine.  For more information, please visit my Disclosures page.

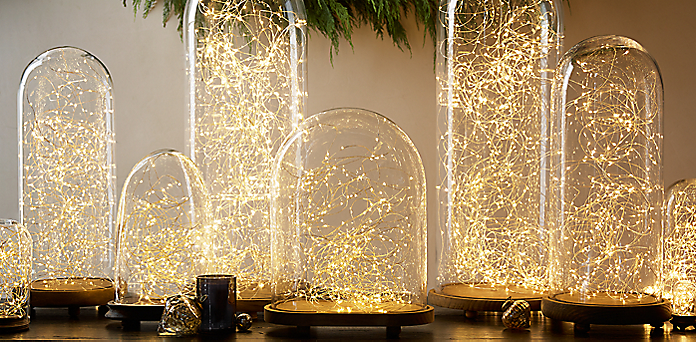
I just l-o-v-e the image on the front of the new Restoration Hardware catalog:

Photo: Restoration Hardware
Gorgeous gold hurricanes filled with twinkly lights...oh most definitely yes.  The only issue?  To purchase one vase of each size and two of the shortest twinkly light strands from RH you would spend $174.  And that's before tax and shipping.  So of course I did it on the cheap and here is my version:


The best part?  They only cost $25!  Here's the breakdown:

Small hurricane: $4.19
Large hurricane: $5.99
(Both from A.C. Moore on sale for 40% off)
Rustoleum Metallic spray paint: $2.74
(From A.C. Moore using 50% off coupon)
Twinkly Lights: $12.50 for two
(From amazon...hereis the link for the ones I bought)
Total: $25.42


Want to try it yourself?  Here are some tips to help you out.  Start at the top of where your gold paint should fade out. Take several quick, even passes as you rotate your hurricane vase, making sure to keep your spray paint at least 6" away from the glass.  Continue to rotate as you work your way to the bottom of the hurricane, allowing the paint to go on slightly thicker as you go.  Allow to dry for a few minutes, then spray just the bottom couple of inches, until the paint is opaque.  You should end up with a nice faded or ombre effect.

What they look like with the lights off...still cute!
A peek inside.
Just in time to get you in the mood for Christmas decorating.


The main difference with mine is that I couldn't find amber lights for cheap on amazon, so mine are warm white.  I was willing to live with that, but you could always pick up the lights from Restoration and DIY your hurricanes; you will still save money and have that pretty amber light.


You could save even more money by purchasing hurricane vases at Dollar Tree.  Either way, let me know if you try it!

 photo e0bcbc63-97e4-4f3b-adae-03bfc854ae09_zpsb8a65301.jpg
Follow on Bloglovin

P.S. Lovin' the Linky's at:


Wednesday, May 28, 2014

Painted Chest Before and After

This project is also appearing today on my new collaboration, Craft for Today!  If you are here from Craft for Today, welcome!  So glad you stopped by!  

Hey peeps! I've got a fun project to show you today.  I was going to wait until I finish it with furniture wax, but that might never happen, so here goes!


I have had this Hope Chest for years, and it has some great qualities.  It's a lot of storage and has a cedar-lined interior.  But, it didn't quite fit with my decor, so (what else?) I painted it!


I started with Annie Sloan Chalk Paint in French Linen.  Just two quick coats of that, followed by some distressing, because you know me and how I be.


Then I took this lovely graphic from the Graphics Fairy, blew it up using this awesome website, and transferred the design using the technique I described here:


(I chose this graphic because I have a little thing for jewelry).  Hand-painting is not as hard as you think! You just need to be like Captain Kirk and boldly go.  I painted this one in chocolate and gold.  Love the subtle shine!


I will ultimately wax with tinted wax, but seriously that might be in a few years!  Hopefully it won't take as long for me to show you more of this bedroom, but I am slow sometimes;)

 photo e0bcbc63-97e4-4f3b-adae-03bfc854ae09_zpsb8a65301.jpg
Follow on Bloglovin

P.S. Lovin' the Linky's at:

http://missmustardseed.com/2014/06/furniture-feature-friday-favorites-link-party-25/   

Wednesday, May 7, 2014

Easy, Personalized Teacher Gifts

Yep, it's that time of year, although it seems highly improbable.  Time to buckle down for eight long lovely weeks of togetherness.  But first, it's teacher gift time!  Because we truly appreciate the effort they make all year long, it is especially nice to thank them at the end of the school year.  Here's an easy craft to get you going.

Last year's version.
The printable is amazing and is available at Balancing Home.  Lots of great printables there!

All your supplies are as follows: cheapie clipboards, scrapbook paper of your choosing, large letter stickers, and Mod Podge (or spray adhesive).  I made nine of these last year for about 20 bucks.

All you do is...
~One~
Cut your scrapbook paper to fit the front of the clipboard.  Don't worry about tracing around the "clippy thing" just right.  Straight lines and right angles work!


~Two~
Make yo'self an assembly line and Mod Podge those suckers to your clipboard.  I will say that Mod Podge works best with a sturdier scrapbook paper.


~Three~
Flip that sucker over, add a strip of the same (or different!  Go wild!) scrapbook paper, and then add your letter sticker to personalize it for each teacher.


So easy, it's ridiculous.  Yet they are cute and practical.  I liked adding the printable you saw above, printed and trimmed to 8x10 on the off-chance that your teacher might want to frame it.

I would show you this year's version, but that would kinda spoil the surprise, wouldn't it?  However, it is easy to imagine these done in any color scheme, with script or three-letter monograms, or customized however you can imagine.  Have fun!

 photo e0bcbc63-97e4-4f3b-adae-03bfc854ae09_zpsb8a65301.jpg
Follow on Bloglovin

Thursday, January 9, 2014

Pinspiration Thursday! New Feature and a Cute How To

Did you think that said Perspiration Thursday?  Just for a second?  Ha!  Gotcha!  Actually, maybe it should be called Perspiration Thursday, since this is my new feature where I actually get off my rear and DO something I've pinned!  It's about time, Michelle. By the way, you can follow me on Pinterest here.  I have crafty boards, stuff for kids, and of course some bling.  You name it, I got it.

So, to kick off my very first Pinspiration Thursday, I bring you:


I got the idea from this crafty pin:

How to Make a Custom Thanksgiving Journal | Life as MOM - simple and easy gift to give or tradition to start. Record your blessings for posterity.

I made it my own by using tiny composition books I found at Walmart.  They are sold in a 3-pack for less than $3, in the office supplies aisle.  They are perfect for purses, and for that reason I thought of them for stocking stuffers and small gifts for friends or teachers for Christmas.  However, they would also be a great gift anytime!

So, without further ado, here's the How-To:

Step 1: Add a Bookmark


Simply glue a length of tiny grosgrain ribbon in-between the back cover and the last page of the notepad.  I used superglue and it worked like a charm.

Step 2: Cut Scrapbook Paper to Size


Step 3: Use Spray Adhesive to Glue to Notepad


Although it requires you to work outside, I strongly recommend spray adhesive rather than Mod Podge.  It won't bubble; enough said.  I have noticed my edges peeling up already after just a few weeks bumping around in my purse, so you may want to go heavy on the edges for yours.

Step 4: Trim Your Corners:


Or, cut your paper to fit the curved corners when you begin, and then you can skip this step, whichever you prefer.

Step 5 (optional): Add Decorative Elements:


I added this little label (it says "musings") which I designed and cut with my Silhouette.

This project took me no more than about an hour and a half, even though I made multiples.  Quick, easy and adorable--how's THAT for a gift idea???

So what do you think of Pinspiration Thursday?  What kinds of Pins should I try out next?

Photobucket
P.S. Lovin' the Linky's at:

Home Stories A to Z

Suburbsmama

Beyond The Picket Fence