Saturday, December 28, 2013

Shutterfly: More than Pretty Pictures

I kinda feel like everybody in the universe already uses Shutterfly.  I've been using them forever for stuff like photo mouse pads, Christmas cards (this year we used their sister Tiny Prints), and photo books.  So naturally I was excited when they recently gave me a chance to review one of their products, and I chose something a little different: an iphone case.  I had NO IDEA they had such a wide selection of cases. Here are some of the super cute options I just love:


I was so pleased with how easy it was to customize the design I chose, and how quickly it showed up at my front door.  Very quickly, I went from this:


to this:


I love the new case.  It is extremely cute, very durable (yep, I have dropped tested it repeatedly), and is getting me mucho compliments.  The only negative I have discovered is that because I got the liner, it is not compatible with my iphone 5 adapter (that gadget which allows my iphone 5 to be plugged into an iphone 4 dock).  If you charge via wire charger this shouldn't pose a problem.  Otherwise, check the design you are ordering to make sure you don't have this issue...there are multiple views of the products and it looks most of the cases wouldn't have this issue.

Overall, I am very pleased with my new case and would definitely recommend this product.  PLUS, I noticed that Shutterfly currently has their phone cases on sale!  This one is currently marked down to $27.99 for the slim version, and I see there are free shipping offers on their website as well.

Happy Post-Christmas Shopping!
Photobucket

P.S. Shutterfly provided me with product to review for this post, however all opinions are 100% mine, all mine.

Wednesday, December 25, 2013

Merry Christmas!

Oh Dear Readers, I hope you are having a very Merry Christmas!  May your day be filled with His joy and love!  I am on vacation with my family but will be back in January...see you soon!

This picture is from a Christmas past; you can see the full post here.
Lots of love,

Photobucket

Tuesday, December 24, 2013

And the Winner Is...

Yay!  I love it when I get to announce a winner!  Thanks to those of you who persisted through my technical difficulties and got your emails and comments in to me...I so appreciate it!  Looks like Pear Applesauce was the most popular recipe, with the Almond Butter and Jelly Smoothie coming in second.  I am going to try both, fun stuff.  If you don't win, I highly recommend "liking" Little Green Pouch on their Facebook page for a discount code and nabbing some of your own.  And now, on to the winner of this:

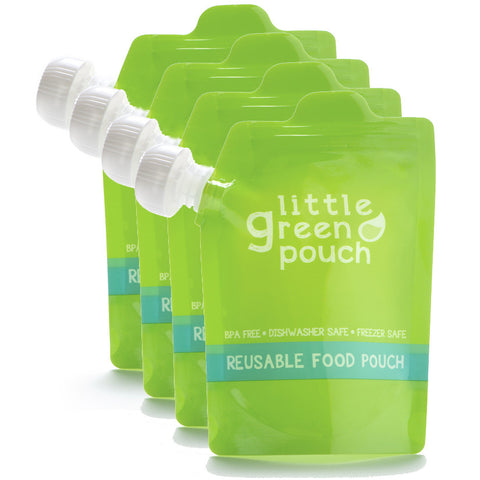
Little Green Pouch - Reusable Food Pouches (4-Pack)


And that lucky person is...


Comment #4: Laura and Matt Diamond who said:
This product is a great idea! I'd would like to try the pear applesauce recipe and I like your idea of putting yogurt in it for school lunches.

Laura, I will be in touch with you soon to arrange delivery!  Thanks again so much for all who entered!

Photobucket

Sunday, December 22, 2013

Technical Difficulties

Boo, Hiss.

Apparently the Comments function of my blog is having some issues.  Several people who have tried to leave comments to enter in the Little Green Pouch Giveaway have not been able to leave their comments.  I am so sorry for those of you who have had your time wasted!

I have messed with my settings and still am not sure the Comments are completely fixed, so I am extending the contest deadline by one day and inviting you to enter via Comment (if you are able) OR via Email if not:

thatmommyblog{at}gmail{dot}com

Contest will be open until Tuesday, the 24th at noon.

Photobucket

Friday, December 20, 2013

It's Giveaway Time! This Product Is Just Awesome

Y'all, this invention is genius.  GENIUS!  Sorry, I yelled.  I am just super excited about the Little Green Pouch.  They are reusable, dishwashable, freezable, cute-as-a-button food pouches.

Little Green Pouch - Reusable Food Pouches (4-Pack)

"What can you put in them, Michelle?"  I am so glad you asked!  The answer is anything that can be pureed. Store-bought or home-made applesauce or other pureed fruits or veggies, yogurts and shakes, and anything else your kids might like.


They are great for you because you can control what food goes from the pouch into your children, plus they will save you a bundle since you can stop buying and tossing those expensive pouches of applesauce.  LB was SO excited when he got yogurt in his lunchbox Pouch the other day (his preschool bans Gogurt because it is too messy, so yogurt at school was a first for him).


Obviously, they are great for kids because kids like to suck their food.

Bonus: they are great for the environment, too.  Pure awesomeness.


We loved trying ours (thank you Little Green Pouch!) and I am even more excited that one of you lucky readers will be winning a four-pack for yourself!  That's a $14.99 value, ladies and gentlemen!  Here are the rules:
  1. Make sure you follow my blog, please, and while you're at it, feel free to follow Little Green Pouch too!
  2. Visit Little Green Pouch by clicking here.  
  3. Then come back and leave a comment telling me which recipe from their website you would make to put in your new LGP's.  
  4. Edited to Add: If you are having trouble leaving a comment, I'm so sorry!  Please enter by emailing me your favorite recipe at thatmommyblog{at}gmail{dot}com.
That's it!  Easy, right?  Trust me, you will love this product.  This giveaway will run until noon on Tuesday, December 24th (Edited: extended deadline due to Technical Difficulties!), and I will announce a winner that afternoon.  Thanks friends and good luck!

Photobucket

P.S. Little Green Pouch provided me with product to review, but all opinions are 100% mine, all mine.

Wednesday, December 18, 2013

Powder Room Reveal!

There has been a toilet in my family room for the last two months.

Okay, I am exaggerating.  Most of the time it was on the deck.  But for much of the last two months it was definitely not in the powder room.


Our Powder Room before.  The wallpaper, in all its blinding glory, was original to the house.
Vintage 1986.
Woe is me, it's been tough.  However, the worst part about re-doing our powder room walls wasn't having to hike upstairs once an hour every day, it was the sheer panic.  You see, my poor Hubs started the fairly routine task of pulling down wallpaper with enthusiasm and gusto, but was quickly beat back by what will be known henceforth as the MAFU (the Mystery Adhesive from the Underworld).  Even a pro couldn't i.d. this stuff.  By the time the wallpaper came down, half the drywall came with it, and we were left with a straight mess.  And panic--what are we going to DO with these WALLS???

Yikes.
Then, like the sun breaking through the rainclouds and lighting up our world, inspiration struck.  Let's just go with it, we thought.  And that is what we did.  We went with it.  We kept all the texture that crazy MAFU left behind and painted right on top of it.  First we primed, then painted with white eggshell paint.  Hubs did sand out the peeling parts and smoothed some of the texture off, but most of it remains.

With primer and paint.  Already looking better.
After he got done painting, I mixed some Martha Stewart glazing medium with artist's acrylics in burnt sienna, raw umber and yellow ochre, until it looked like a color I could live with.  Then I toweled it on the wall, right on top of the texture. And here is the final result:


Here is a close-up of the wall.  I am trying to show you both the actual texture and the faux-texture of the glazing, but as you can see it is very hard to tell.  And that is the beauty of it.  We didn't have to re-mud our walls or hang new drywall.  We just went with it.


One more time with the Before and After:


Obviously, there is some decorating left to be done.  But I couldn't go another day without sharing my total relief. It's the total relief of just going with it.  And having the toilet back doesn't hurt either.

Photobucket

Monday, December 16, 2013

Christmas Decorating (It Is What It Is)


Merry Christmas!  
I wanted to share the highlights of my Christmas decorating for this year, or as I like to call it: "It Is What It Is!" I am  proud that I didn't buy anything new this year, just found stuff in cardboard boxes and threw it around like a maniac.


I have been loving all the Holiday Home Tours all over blog land...so many beautiful homes to admire at the holidays, right? In stark contrast, the reality around here is that we moved in three months ago and I am just happy to have trees up and stockings hung!  It Is What It Is.

In the Family Room...
Our Fireplace
This candle makes me happy.
And on the other side of the room:
The Family Tree
It's home to all our precious hand-made and very colorful ornaments.
And I try and get some red and aqua in there too!
 And in my Office...

The Mommy Tree

It's home to all the most precious sparkly ornaments...
and a few rustic touches of course!
In the kitchen...

This little guy keeps me company at my kitchen sink.

And here's the shelf above my computer desk.
Yeah, they made the tour.  Moving on...

In the Dining Room...
Love the "crown" of fresh evergreens on my china cabinet in the dining room.
Lego Advent over on the console.  Anyone else doing these?  So fun.

Did you notice there's a lot of close-ups on my tour?  That's because I couldn't be bothered to move the piles of junk.  Sorry about that, but really.  Who can clean house with all this holiday madness going on?!?  Next year when I can get my act together maybe we'll do a gorgeous whole-house tour. For now, it is what it is!  Thanks for joining me and hope you enjoyed!

Photobucket

P.S. This post may contain affiliate links, but all opinions are 100% mine, all mine.
P.P.S.  Lovin' the Linky's at:

The Nesting Place Christmas Tour of Homes

Tuesday, December 10, 2013

Easy Gingerbread Houses (Part Tu-torial)

This post may contain affiliate links, but all opinions are 100% mine, all mine.


Some of you have been here long enough to remember the gingerbread playdate I blogged about a couple of years ago.


Loving my boys in their chef's hats!  You can find them HERE.

Barry felt right at home.
Well, these little gingerbread cottages have become an annual tradition around here, and with dozens of these beauties under my belt I figured I'd whip up a quick tutorial for you (also, my girl asked, so this one's for you B!)

First of all, AND THIS IS NEW VERY IMPORTANT INFO, please use only Honey Maid Graham Crackers.  Do not attempt to get frugal with generic crackers.  Do not attempt to go classic with the cute red box.  I am speaking from experience here.  Your cottages will suffer for your frugal, traditional ways.  BUY THE BLUE BOX.  And buy enough to allow for some arriving broken or being broken in the process of building.  Got it?  Here, let me help you:


Second, after the first year I gave up on assembling the cottages with icing and resorted to hot glue. By all means, use icing if you are making these for your family.  If, however, you are making 6 or more cottages, use hot glue. It is so much faster and no one eats them anyway.

Finally, the original inspiration for these was all Martha.  I also still use her Royal Icing recipe for the excellent, super-hardening icing which holds the candy in place.  It's super easy: mix 1 pound of powdered sugar and 5 tablespoons of meringue powder with 1/2 Cup of water.  You can add a bit more water if the icing won't spread, and lemon juice or peppermint extract if you prefer to have some flavor.  I usually double or even triple the recipe and keep leftovers in the fridge for Valentine's Day cookies.  The meringue powder is your friend because that's what makes it harden so much.  You can buy some here:

I recently used this brand after not being able to find my usual brand in stores, and it worked great!  Also, royal icing can require several minutes of beating.  I like using a whisk attachment on my KitchenAid stand mixer to make things easier:)  Enough words, on to some pics and if you have any questions, please speak up!

Easy Gingerbread House Tutorial Graham Crackers
Prep: you will need four graham crackers per cottage.  Break two in half to form four squares.  For the other two, carefully cut as shown above with a serrated knife.  Use a gentle back-and-forth action for the least amount of breakage.
Easy Gingerbread House Tutorial Graham Crackers
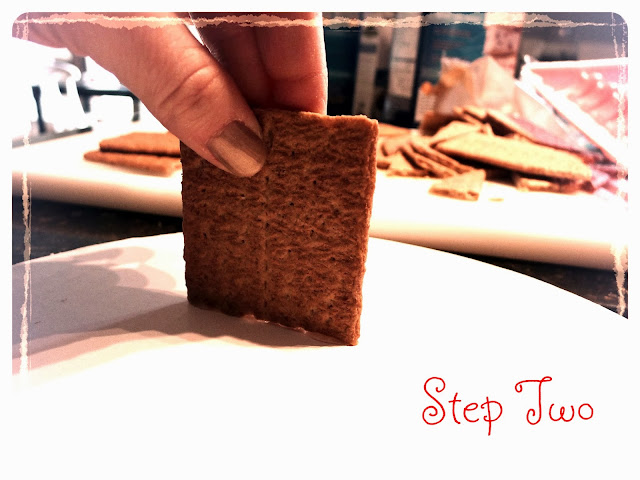
Glue a square to your cake round (or a paper plate).

Easy Gingerbread House Tutorial Graham Crackers

Attach one of your peaked-roof crackers by gluing it to the cake round and the first square.

Easy Gingerbread House Tutorial Graham Crackers

Repeat, with your second peaked-roof cracker. 

Easy Gingerbread House Tutorial Graham Crackers
Add the final wall of your cottage.

Easy Gingerbread House Tutorial Graham Crackers

To each side, glue a square to form a roof.  There will be a gap at the top of the roofline, but I have found that it works just fine for decorating. 

Easy Gingerbread House Tutorial Graham Crackers

There you have it: Easy Gingerbread Houses! Now you are all ready to decorate and have fun! Enjoy!

Love,