Some of you have been here long enough to remember the gingerbread playdate I blogged about a couple of years ago.


Loving my boys in their chef's hats! You can find them HERE.
 |
| Barry felt right at home. |

Second, after the first year I gave up on assembling the cottages with icing and resorted to hot glue. By all means, use icing if you are making these for your family. If, however, you are making 6 or more cottages, use hot glue. It is so much faster and no one eats them anyway.
Finally, the original inspiration for these was all Martha. I also still use her Royal Icing recipe for the excellent, super-hardening icing which holds the candy in place. It's super easy: mix 1 pound of powdered sugar and 5 tablespoons of meringue powder with 1/2 Cup of water. You can add a bit more water if the icing won't spread, and lemon juice or peppermint extract if you prefer to have some flavor. I usually double or even triple the recipe and keep leftovers in the fridge for Valentine's Day cookies. The meringue powder is your friend because that's what makes it harden so much. You can buy some here:

I recently used this brand after not being able to find my usual brand in stores, and it worked great! Also, royal icing can require several minutes of beating. I like using a whisk attachment on my KitchenAid stand mixer to make things easier:) Enough words, on to some pics and if you have any questions, please speak up!
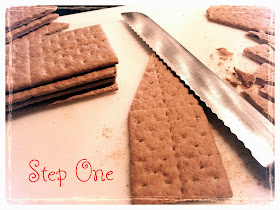
Prep: you will need four graham crackers per cottage. Break two in half to form four squares. For the other two, carefully cut as shown above with a serrated knife. Use a gentle back-and-forth action for the least amount of breakage.
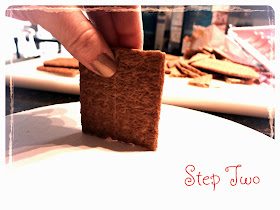
Glue a square to your cake round (or a paper plate).
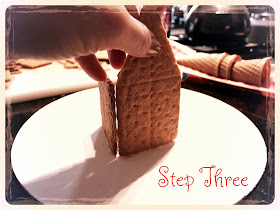
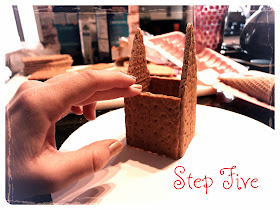
Attach one of your peaked-roof crackers by gluing it to the cake round and the first square.
Repeat, with your second peaked-roof cracker.
Add the final wall of your cottage.
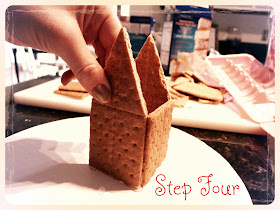
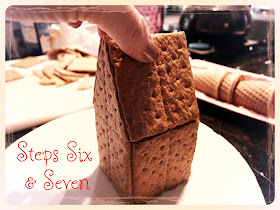
To each side, glue a square to form a roof. There will be a gap at the top of the roofline, but I have found that it works just fine for decorating.
There you have it: Easy Gingerbread Houses! Now you are all ready to decorate and have fun! Enjoy!
Love,




So glad to have found this, going to have a gingerbread house party at my place. And I love the chef hats, so fun!
ReplyDeleteI know this is an old post, but I'm going to follow this for a birthday party this Sunday. How far in advance do you think I can make these? Thank you! Very cute and easy idea!
ReplyDeleteThanks for your comment! I think you can make them days in advance--I've done it up to 4 days before the party and then they keep for weeks afterward. Have fun!!!
DeleteThank you for posting this and your great ideas! Question...how many servings/batches do you make of the royal icing?
ReplyDeleteThat will all depend on how many houses you need to ice, but one batch should ice about 10 houses. I usually double or even quadruple the recipe, and refrigerate the ample leftovers to use for Christmas cookies.
DeleteI find it's easier to use hot glue because it sets quickly, but of course then they are no longer edible! So I guess there are pros and cons to each method:). Have fun!
DeleteYou should do the burnt sugar method instead of glue gun; it dries very very fast and keeps it completely edible; I've never seen kids not want to eat theirs.
ReplyDeleteThat’s a new one for me! Maybe I will try it sometime:)
DeleteHi Christine, i was thinking of using hot glue for my daughter's birthday party then i saw your comment. What is the burnt sugar method, if you don't mind me asking.
DeleteLOL I feel your pain!!! Thanks for sharing:)
ReplyDeleteWe dipped the waffle cones fully into green dye/water and then let them dry overnight. They turned out like perfect little trees for decorating!
ReplyDeleteWhat a wonderful idea! I might try that this year myself:)
DeleteLauren- How many boxes of Graham Crackers did you need to make your houses? Creating these with 18 first graders as well!
ReplyDelete