Saturday, October 30, 2010

Happy Halloween!

I just had the best Saturday morning ever!  Sleep, followed by baking, followed by carving pumpkins.  So much fun.  It reminded me of why I love Halloween!  This is the second year in a row I have made these cute little cookies, and it is well on its way to becoming a tradition around here.

They're great.  I'll put the recipe below in case you're drooling.

I also made Candy Corn-Popcorn Balls for a costume party we're going to this afternoon--yum!

Can you tell I love candy corn?

Then we carved pumpkins.  When I asked my son what kind of face he wanted on his pumpkin, he replied, "thirsty!"  So here's what I came up with--does he look thirsty to you?

 I don't know what it looks like to me, but definitely not "thirsty."  Maybe "panting-y."

Meanwhile, That Daddy was busy with his own:


That's right, he carved a pumpkin to look like Lionel Richie.  Who does that?  It is remarkable how it just walks the line between impressive and creepy.  I will be interested to see how many parents get it, and how many just think we're freaks.

Okay, so here's the recipe I promised.  It is from an old Martha Stewart Food magazine.

Candy Corn Sugar Cookies
4 T. unsalted butter, very soft
1/2 C. sugar
1 large egg yolk
1/4 t. vanilla extract
1/4 t. baking powder
1/4 t. salt
3/4 C. all-purpose flour (spooned and leveled)
About 36 candy corns

Preheat oven to 350.  Place butter and sugar in a medium bowl--beat with a wooden spoon until combined.  Beat in egg yolk, vanilla, baking powder, and salt.  Add flour and mix to form dough.

Scoop out level teaspoons (yes!  they will seem tiny!) of dough:


Then roll them into balls.  Doing all the rolling after you do all the scooping saves time.  Place on baking sheets 2 inches apart.  Bake, rotating sheets halfway through, until edges are firm and cookies are dry to the touch (do not let them color), 10-12 minutes.

Remove from oven and gently press a candy corn into each cookie.  Eat up!


Hope you and your family have a very Happy Halloween!

Friday, October 29, 2010

Mommy's New Gallery Wall

Do you love a gallery wall as much as I do?  I have an obscene lack of wall decor in my house, and have been slowly trying to correct this particular deficiency.  The problem is how pricey it can get!  So, after I found a set of six large frames for $8 at a yard sale a couple of weeks ago, I set a challenge for myself--turn those frames into something fabulous without spending another cent.  Could I do it???

I won't make you wait--here's the final result:

The close-up, and...

The (not so great) shot of the wall.  Why are walls so hard to photograph?

I've been wanting to use these pictures for a long time.  My grandmother, who passed away in 2005, gave most of them to me years ago because she knew I was interested in our family's genealogy. I wish she could see how I have displayed them here.  A few are from my husband's family, and I was so glad to have those too.  I know I will love coming into this room and seeing them.

I love seeing what mattered to them--posing with their cars or fur coats.
That one in the middle is my Great-Uncle's school bus.  There he is posing in a
barrel that has the words "The Prize" on it.  Wish I knew the story behind it!

I love these pictures.  The one in the upper left-hand corner
is my Great Grandmother in 1924 when she was 14 years old, posing with
her dog Peggy.  I just love these little glimpses of their lives.

So, how did I get here?  Here's what the frames looked like before I started:

Six big wooden frames with glass, mats, hardware...all for $8!

The women who sold them to me said she wanted to paint them all black but got sick of it halfway through.  I can totally understand that, because she was doing a very careful job with a paintbrush.  I, however, decided to go another way and did a very sloppy job with a can of spray paint.

Truth be told, it hurt a little to cover the black paint since I am usually all about black frames.  But these were going in my Craft/Guest Room, so they just had to be Heirloom White.  It was really the only choice out of the paints I had on hand...of Heirloom White, Silver, Outdoor Rustoleum Black, or Brown Primer, which would you choose???

I also got lazy with the backing and just used (what else?) burlap which I cut to size and attached to the included cardboard backing with spray adhesive.  Again out of sheer laziness, I used the cardboard fold-out hanger rather than attaching hardware to the frames.  If it works, I'm doing it!

Little tip: make sure you mask your cardboard hanger so you don't adhere your fabric to it--
I used little post-it notes and it worked great.

The most fun part of this project was building my layout.  I got to sift through old pictures and play with the layout until it looked right to me.  I love this gallery because it is cohesive and simple, but I still got to showcase 32 (!!!) photographs.  That's a lot, peeps.


I used mostly black-and-white or sepia, but if I liked a color photo, I used it.  I love this one of my Grandmother's brothers playing their accordians together.


And these reddish ones of my husband and I:

Awww--we're so cute!  Why were the Seventies so red?

I hesitated because they are so very, very red, but in the end I included them because they relate to the other pops of red in my room:

An Ikea pillow and a Mod-Podged coaster.

If I change my mind later, I can always change out the pictures.  I was careful to use a light touch to mount them to the burlap.  I used Stampin' Up's Stampin' Dimensionals (SU--here I go again endorsing your products!  I'm not even a consultant!)  They are removable and won't harm the backs of the pictures, all of which have notes on them.


Speaking of the notes, I didn't trust my memory to come through in case someone asks me, "who's that?"  I can't even remember how to dress myself most days.  So I made a little chart for the back of each frame for reference:

Note how carefully I trimmed the burlap:)  Yes, the backs still look like this!

So, I met my goal of not spending any more money, plus I have a gallery which showcases my ancestors, uses lots of pictures while still looking tidy, and fills a giant blank wall.  Here's what it now looks like from the hallway into my guest room, and my hope is that it warms up this room and invites people in to have a closer look.


P.S. I'm lovin' the linkys at:

Updated on 4/6/11 to add this
fun party from The Inspired Room
The Shabby Nest


Beyond The Picket Fence
Beyond the Picket Fence


Monday, October 25, 2010

More Fall Fun? Surely You Joust!

For whatever reason, we usually travel a lot in the month of October.  So, having just come back from my big trip, I purposely reserved the entire month for stay-home-except-for-fun-local-family-outings month!


This weekend we got to enjoy the beautiful weather...go on a hayride...go through a corn maze...pick out pumpkins...all the basics.

Our Fearless Leader

This was even the second visit to a pumpkin patch this year for certain Big Boys.
Have I ever mentioned that I love Fall?  I have?  A million times?  Hmm, must've slipped my mind.

LB was hysterical with an ear infection for half the weekend, but at least we discovered it in time to get him in to the doc on Friday afternoon.  I just want to know why it's always Friday afternoon???  Why doesn't he ever come down with a fever on a Monday morning?  In spite of the infection, we set out Saturday for the Renaissance Festival to celebrate my Mom's birthday with her.  We couldn't stay long but still got to take in a joust or two.  I admit it, I love the Renaissance Festival!


Happy Birthday Mom!

P.S.  This is what happens when you decorate your cupcakes after drinking a glass of wine.
Or two.  Oops!

Hope you had a great Fall weekend too!

Friday, October 22, 2010

This is Not a Decorating Post


Last weekend the Hubs and I loaded our boys in the car and took a long drive to a "ranch," also described as  a "Drive-Thru Petting Zoo."  It is a very cool premise, although I am not sure how humane it is.  On the plus side, the animals roam free in a very natural setting.  On the negative side, they don't roam so much as stand in front of cars, hungrily eyeing the drivers.


When they are not menacing people, they are drooling.  Also, they are smarter than they look because most of the drool lands on the handle of the car door, such that getting out is easy, but getting back in requires HAZMAT gloves.  They are probably trying to up their odds if for some reason you decided to get out...then run for your life back to your car only to stop short at the sight of a quart of goop on your door handle.

You don't have to buy a bucket of feed for them, but of course we did.  Then we promptly failed to read the brochure which clearly states that if you want to keep your fingers, you must FEED THEM FROM THE BUCKET, so our first attempt at feeding ended when the Hubs had to launch the food out of his hand to keep from losing it to a half-crazed Dik-Dik.  Or something.  I don't know what its called, so I am calling it a Dik-Dik.


Speaking of crazy, have you ever casually turned to look out your window, and found yourself inches away from the giant eyeball of a hungry bison?


Yeah, I definitely yelped in surprise a few times.  And also asked for the window to be rolled up, repeatedly.  One time we all frantically rolled our windows up, only to realize the baby was back there with his window all the way down, laughing.  Great moments in parenting.

Subsequent feedings from the bucket went more smoothly.  I especially enjoyed the llamas, which were generally pretty cute.  They definitely weren't as creepy as the goats (goat eyes weird me out) or as scary as the bulls with 6-foot horns.  Even with the llamas, though, there is this problem of how to stop once you start.  You put your bucket out the window, and suddenly every furry beast in the vicinity knows you're a sucker.  They proceed to fight over the food while you figure out how to roll up your window without sacrificing your bucket or your hands.

The rear view.  Not as cute as their faces.  But I had to choose: feed them or take a picture!

Near the end of our drive-thru experience we came across the zebras, and finally I was enjoying myself as much as the boys were.  They were beautiful!


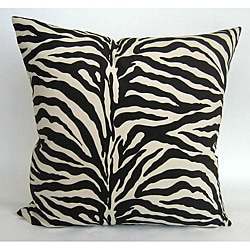
Seeing them put me in the mood for one or two of these:

Zebra 24-inch Feather and Down Throw Pillow
Photo: overstock.com

Now, who said this post wasn't about decorating?

Wednesday, October 20, 2010

Gettin' Spooky Wit' It

Yeah, sorry about the title of this post.  All I can come up with is cheesy spoofs of rap songs.  At least I didn't call it "It's Getting Spooky In Here, So Hang Up All Your Ghosts."  Aaaaanyway, did y'all see these cute ghosts in this October's Country Living?

Photo: Country Living

Can ghosts be cute?  Well, if they can, these are cutie-pies.  I followed their instructions extremely closely, and set up my little ghost-making station by taping two cups together and topping them with small balloons.

Does anyone else have trouble blowing up balloons?
Only the screech of my toddler desperate for a balloon could make me do it.  Weird.

I then used 8-inch squares of cheesecloth (I used a double layer) and dipped them in the fabric stiffener, then draped them over my balloons.  The fabric stiffener was really too thick and you should dilute it quite a bit if you want these guys to dry in less than six hours.


While they took up real estate on my counter all day, I cut out small felt eyes and mouths, then glued them on with craft glue when the ghosties were finally dry and removed from their balloon molds.  To hang, I decided it was much easier to tie fishing line around a bead rather than through their heads.  I just tied a bead on one end like so:


...then threaded the other end through the ghost's head, such that the bead prevents the fishing line from slipping through.  Tied them up to my light fixture, and voila!  Ghost-abulous.

I think they are adorable!

Or are they creepy?  You be the judge.

"I'm cute, not creepy!"  Ms. Pacman told me so!


P.S. Lovin' the Linkys at:
The Shabby Nest
The Shabby Nest
Finding Fabulous
A Few of my Favorite Things

Fingerprints on the Fridge